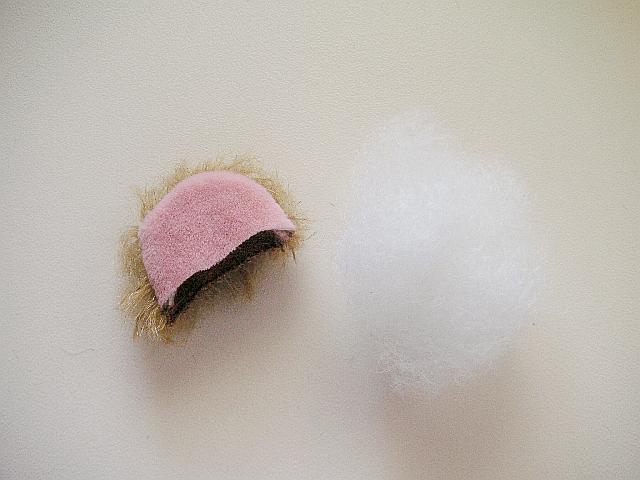
Start by cutting the pattern pieces from fur and pink mini fur.
To add an open mouth to an existing bear, make a template by using the ear pattern from that bear and shrink it a little (about 10 to 15%), then follow the instructions below

With right sides together, pin and sew fur to mini fur pieces around the curve sides

Turn right side out and brush all fur around the seam

Place a very small amount of polyester filling inside the 'lower jaw'

Zigzag or whip stitch it close, and with long stitches sculpt the middle part of this jaw (this will give the impression of a tongue within the mouth). Trim excess fur around the curve edge.

With the fine point of a dark Copic marker, paint a fine line on the curved edge of the jaw (this will be the lip). Set aside

With a pair of sharp scissors trim the fur from the bottom part of the chin (as close as you can)

This is what it looks like after it's been trimmed


Pin the lower jaw piece to the head, covering the area you've just trimmed

Follow the photo and diagram below to see how and where to place it. This is very important, because if the jaw is placed too far forward, the bear will look like it has an over bite; and if it's placed to far back, you won't be able to see it.


Once you're happy with that look, take the lower jaw piece off but leave the pins in place

The pins will give you an idea of where to paint the palate (or roof the mouth). Following the photo and diagram below, paint an area only as big as the jaw piece you've made. Always use a very dark brown or black Copic marker to do this. Try to make it as dark as possible


Using a long darner and double upholstery thread to mach fur colour, start by inserting the needle inside the neck and exit at the back centre of the shaded area

Insert the needle 1cm in front of the last stitch (along the seam), and exit next to the inside corner of the eye. Pull tightly. You should be able to lift the upper palate slightly.


Important Note: If you find that the eye area caves in more than you can lift the palate, try this tip: As you pull up the stitch in the upper palate, push up against the stitch with your finger, holding it in place as you re-enter the bears head next to the eye for your next stitch, you’ll get a better lift on the palate, and less pucker on the eye area.
Insert the needle almost next to where your last stitch is, and exit at the end of the last stitch on the palate


Again, insert the needle about 1 cm towards the front of the head, along the seam, and exit next to the inside corner of the other eye. Pull tightly to lift the palate


Repeat steps 15 and 16, until you reach the very front of the shaded area


The last stitch should be where you started (at the back of the shaded area). Make a knot or two to finish off. If you can see the stitches, paint them with your dark Copic marker to make them disappear

Using the same upholstery thread and long darner, ladder stitch the lower jaw to the head (only a couple of stitches on either side will do).


To go from one side to the other of the jaw, insert needle from the side you're working on and exit at the back of the jaw. Then insert needle next to the last stitch and exit on the other side. (If you try to go directly across from one side to the other of the jaw, you'll be able to see the stitch on the roof of the mouth - and that's one thing you don't want!!).


To add an open mouth to an existing bear, make a template by using the ear pattern from that bear and shrink it a little (about 10 to 15%), then follow the instructions below

With right sides together, pin and sew fur to mini fur pieces around the curve sides

Turn right side out and brush all fur around the seam

Place a very small amount of polyester filling inside the 'lower jaw'
Zigzag or whip stitch it close, and with long stitches sculpt the middle part of this jaw (this will give the impression of a tongue within the mouth). Trim excess fur around the curve edge.

With the fine point of a dark Copic marker, paint a fine line on the curved edge of the jaw (this will be the lip). Set aside

With a pair of sharp scissors trim the fur from the bottom part of the chin (as close as you can)

This is what it looks like after it's been trimmed


Pin the lower jaw piece to the head, covering the area you've just trimmed

Follow the photo and diagram below to see how and where to place it. This is very important, because if the jaw is placed too far forward, the bear will look like it has an over bite; and if it's placed to far back, you won't be able to see it.


Once you're happy with that look, take the lower jaw piece off but leave the pins in place

The pins will give you an idea of where to paint the palate (or roof the mouth). Following the photo and diagram below, paint an area only as big as the jaw piece you've made. Always use a very dark brown or black Copic marker to do this. Try to make it as dark as possible


Using a long darner and double upholstery thread to mach fur colour, start by inserting the needle inside the neck and exit at the back centre of the shaded area

Insert the needle 1cm in front of the last stitch (along the seam), and exit next to the inside corner of the eye. Pull tightly. You should be able to lift the upper palate slightly.


Important Note: If you find that the eye area caves in more than you can lift the palate, try this tip: As you pull up the stitch in the upper palate, push up against the stitch with your finger, holding it in place as you re-enter the bears head next to the eye for your next stitch, you’ll get a better lift on the palate, and less pucker on the eye area.
Insert the needle almost next to where your last stitch is, and exit at the end of the last stitch on the palate


Again, insert the needle about 1 cm towards the front of the head, along the seam, and exit next to the inside corner of the other eye. Pull tightly to lift the palate


Repeat steps 15 and 16, until you reach the very front of the shaded area


The last stitch should be where you started (at the back of the shaded area). Make a knot or two to finish off. If you can see the stitches, paint them with your dark Copic marker to make them disappear

Using the same upholstery thread and long darner, ladder stitch the lower jaw to the head (only a couple of stitches on either side will do).


To go from one side to the other of the jaw, insert needle from the side you're working on and exit at the back of the jaw. Then insert needle next to the last stitch and exit on the other side. (If you try to go directly across from one side to the other of the jaw, you'll be able to see the stitch on the roof of the mouth - and that's one thing you don't want!!).


Once you've attached the jaw piece on both sides to the head, you'll find that the mouth looks almost close. You can leave it as is, or you can give a big grin to your bear by pulling the jaw (with the help of a pin) toward the neck. This will make the mouth open.


Sew the back of the jaw to the head with ladder stitch and close with a couple of knots. Cut threads off and brush fur that might be caught in the stitching


To further make your bear happy, following the line of the jaw, trim some of the fur on the side of the bear's head.


Embroider the nose of your bear (refer to my 'Nose Embroidery Tutorial'- steps 1 to 10). Then, once that's accomplished, the last stitch should be done by inserting the needle at the bottom right hand corner of the bear's nose, exiting at the place where the mouth palate starts, along the centre front seam


Following the 'Nose Embroidery tutorial' steps, finish embroidering the nose without the mouth stitches

Thanks Monica for sharing your knowledge. This was just what I was looking for.
ReplyDeleteСпасибо)
ReplyDeleteЗдорово! Спасибо большое!
ReplyDeleteThis comment has been removed by the author.
ReplyDeleteWhat an amazing lesson, - thank you so very much!
ReplyDeleteBest regards from Eva Mari in Norway :)
( Had to edit a typo... )
you make it look so easy! the step by step is AMAZING!! going to give this ago.
ReplyDeleteMany Thanks Jane xxx
Hi, I have just come across your tutorials, thank you for taking the time to share your knowledge. It is very much appreciated. I am a total novice but feel more confident having seen your step by step tutorials.
ReplyDeleteThank you again,
Evie x
Thank you so much!!
ReplyDeleteKind Regards.
Willemina.
Grazie 1000.
ReplyDeletethank you very much Monica, I often look at your bears for inspiration & adding that special touch.
ReplyDeletethank you very much Monica, I often look at your bears for inspiration & adding that special touch.
ReplyDeleteYour tutorials are so helpful and your bears are adorable. Are they Kits or your soul creations?
ReplyDeleteHi is it possible to get the pattern for this bear. You may well have posted it already and I have missed it
ReplyDeleteGeoff
I would make one if my hands could do it, but they can't. I would like to buy one of these adorable bears. Is anyone interested in selling ?
ReplyDeletehttps://www.facebook.com/ChiffouNours/
DeleteI just happened upon this wonderful tutorial. I plan to go back to the beginning and make me a bear! Yours is adorable.
ReplyDeleteThe tutorial is so clear and easy to follow.
Thanks for sharing so generously with us.
Is this considered plush?
ReplyDeleteYou know, I always thought the ancestors of my beloved teddy stretched far into history. It was only recently that I found that the history of teddy bears went only as far back as 1902! Shocking! funny teddy bear names
ReplyDeleteI wanted to thank you for this excellent read!! I definitely loved every little bit of it. I have you bookmarked your site to check out the new stuff you post. toys for 2 year old
ReplyDeletehttps://www.facebook.com/ChiffouNours/
ReplyDeleteMerci pour ce merveilleux tuto
I have only just found your site, it’s amazing. Just made an open mouthed bear and quite pleased with the result, will attempt another. Thank you so much for sharing your knowledge
ReplyDeleteThis is wonderful. Thank you for sharing your knowledge with the world.
ReplyDelete